A place where a wee Scot can talk about the stuff she bores other folk with. Sewing, The Beatles, cats, and zumba may feature...

Thursday 23 July 2015

My first Emery Dress: polka dot by blog name, polka dot by nature

A typical summer's day in Scotland
Is it just me, or is anyone else a total slow coach at sewing? I've just this minute finished my first Emery dress (which is only my second ever woven dress) and it has taken me approximately 3 full days (say, for instance, that a full day counts as 7 hours continuous activity). At time of writing I'm too tired to even put make-up on and get a photo of the dress on me (but in true Mr Benn fashion, as if by magic, here I am in the dress now).
Sorry about the location, background objects, shoes, focus...look i'm just sorry for everything OKAY
What to say about my experience of this very popular pattern? The style is right up my penny lane, being a lover of 50s/60s fashions. I had worried that the gathered skirt would make my hips, arse, and tummy look even bigger than they are in my head, but I actually feel nice in the silhouette.
Image from Christine Haynes' shop
Sizing wise, I used the pattern size 14 for the bodice and cap sleeves, and graded out to the 18 for the waist. Learning as I have recently that I should be choosing sizing according to my high bust (which is 38"), I should have cut a 12 in the bodice and then done an FBA, but having read a few other people's experiences of this dress, I cut the 14 based on my actual boob measurement (41") and I'm quite pleased with the fit.

The wind was starting to get up and the patio umbrella had just blown over but look at me not caring one jot
Some great advice I learned at last year's dressmaking course was to always measure pattern pieces, and not just go by the measurements listed on the pattern envelope. I'm glad I did, because based on my waist measurement (38"), the pattern envelope lists finished measurements for size 16 as 39 1/2 inches. After measuring the pattern pieces (taking into account darts, and seam allowances), the waist for a size 16 would only be 36 6/8 inches. Size 18 pattern pieces measured to 38 6/8. I decreased the seam allowances to 3/8 when sewing and the waist is just right on me in the finished dress.
Pre neck, sleeves, and skirt hems
Although I needed an 18 for the bodice waist, I knew that the hips were going to be full of ease, so I boldly cut a 14 in the skirt. My thinking on this was to reduce the amount of gathers so there wouldn't be a party going on round my waist. I think this worked well and feel like my gathered skirt looks less bulky round the waist than others I have seen. Having measured the pattern pieces for the 16 (when I was thinking of using that size) I worked out the total width of the ungathered skirt waist would have been 64 1/2 inches. I'm actually wondering now how much smaller I could go with the skirt...I have only ever sewed up one other skirt and that was a full circle skirt for the Sew Over It Betty dress (still unfinished!), so I'm not greatly knowledgeable about sewing skirts, although I'm already preferring a gathered to a full circle.

Fabric was 3m of quilting cotton from my local shop The Cloth Castle in Victoria, Canada (which I brought with me to Scotland, together with the Emery pattern). The fabric cost $10 a metre and I got it last year I think. Now there's me thinking that $10 is breaking the bank...but since being home and using a roughly $2 to £1 conversion...5 quid a metre is a bloody bargain, naw? It's quite soft but not thin, and says it's made in Japan no less (it also says Sevenberry on the selvedge so I guess that's the fabric manufacturer). Anyway, I'd been saving it for a toile because let's face it, I can always get this print quite easily again should I want to.
Cutting out the last piece with inches to spare...or so I thought. Foiled again!
I was oh-so-pleased with masel when I cut out the final piece of the pattern with about half a dozen inches of fabric left (this was cutting the short sleeve version, sans bow and sans collar). Jammy big smile on my face, so I had. Only to realise shortly after that I had forgotten to cut the front bodice lining!! The only thing I had to hand was a very thin, but soft, bright yellow cotton that I'd used to underline an eyelet woven tee top I made since I've been home. I was in no mood to make a trip up to Glasgow (£6 train fare!) just to buy some lining fabric in the right colour, which would cost less than the train. So using the bright yellow cotton it was!
Bright yellow bodice lining - file under 'what was I thinking'
I really wanted to follow the pattern to the letter, I basted when it said baste, I pressed when it said press, I finished the seams when it said...you get the idea. So although I had read plenty of reviews of the Emery which didn't have lined bodices (bodii?), I really wanted to toe the line on this one. I bravely marked up the 16 darts which would be sewed up on the bodice and lining. I even sewed every one of them buggers (and actually, what good practice!!! I feel quite a bit more confident with darts now). Then...I decided to forego the lining after all. Despite the baltic temperatures of this year's Scottish summer (seriously, I'm too numb to even complain anymore), I seem to get hot very easily lately so thought I would rather have an unlined bodice and more air circulating round my body than have the dress look nice on the inside.

My lovely neckline all puckered after folding over the bias binding twice
Using Christine Haynes' (who designed the Emery pattern) helpful sew along posts, she'd offered many options to key design parts in sewing up the dress, one being omitting the lined bodice and using bias binding at the neck instead. I even had matching binding left over from the eyelet woven tee (which I'd also bound at the neckline). Now, following Christine's instructions, I folded the binding over twice before finally sewing to the neckline. However, it puckered my entire neckline! So I unpicked it all and then just folded the binding once (so the binding is visible inside the dress). This left dirty great holes in my dress, maybe my sewing machine needle is too big? I've tried steaming the area where the unpicked stitches were and the holes have closed a little, but not fully. This to be remedied!
The holes are the stitches where I had originally folded the neckline over the binding twice
The overall fit has turned out pretty good, except that my torso is obviously a bit shorter than the pattern, so I'll need to shorten the pattern piece next time (probably by an inch). Having already sewn the skirt onto the bodice, I thought I would try the lazy-gals-guide-to-fit and hoiked up the shooders of the dress and sewed another inch past the seam allowance on the shoulders. This helped the dress hit my waist perfectly, but my boob darts became too high and the fit on my arms became tighter (which it hadn't been). So I unpicked that angry inch and left a half inch plus the original seam allowance of 5/8. As I say, I'll shorten the torso pattern piece next time. For the moment, I can live with the way it is on this dress, although I have a bit of ruched up fabric on my back but how often is that going to be so visible as to annoy me? Out of sight, out of mind, dear readers.
The wind caught my skirt and made it all poufy. I'm so pleased with that hem!
The final step in finishing the dress was to hand-stitch the skirt hem, and again I followed the instructions exactly, and I'm so glad I did. It turned out as damn near exquisite as you can get on your first go. I used the Craftsy tutorial which Christine Haynes had written on this sewing technique, and I really took my time (managing to catch a single thread of the fabric for the majority of stitches. I hope this will be strong enough, or will it break?). I used the half inch turn-up, followed by another 11/2 inch turn up as recommended, and, with a full 2 inches off the bottom of the skirt, it hits the bottom of my chubby wee knees just how I would like it to.
Unlined and loving it
Best thing about the dress? The pockets! Cliches are cliches cos they are true!
Couldn't get a close match on the zip colour but who cares! And I cut away bits at the top of the zip when I had folded the neckline over the bias, which I then unpicked and now the top of the zip is a bit of a mess. Again, am I bovvered?
I'd been wanting to try the Emery for a long, long time and now pleased that I've completed it and that I like it and actually feel nice in it. It's a very wearable retro-style dress, with lots of opportunity to customise and sew up with different fabrics. Look at this brilliant tartan one!
I paid £1.25 for each of these in the end, plus two vintage bridal patterns, from a lovely man's antique shop in Ruthven Mews up the west end of Glasgow
So, that's the Emery off the list. Next up is either grading one of the vintage patterns I bought last week, or the Sewaholic Cambie pattern (which I also brought with me). I've a 60s night coming up, so veering towards the vintage Simplicity one,  especially as I have a Craftsy class in grading to watch. I also have fabric in mind, which I bought at the Cotton Print Factory Shop last week, and I've already purchased a co-ordinating zip. Sorry Cambie, you're next on my dance card though!
Really looking forward to this night at The Renfrew Ferry, it's gonnae be a gas, gas, gas!

Costs:

  • 3m fabric from the Cloth Castle, Victoria, BC=$30CAD (£15)
  • 22" invisible zip from Remnant Kings=£1.50
  • navy and white cotton threads from Remnant Kings=20p (I think I was mischarged!)
  • navy double fold bias binding from Remnant Kings=bought for a previous project
  • yellow cotton lining from Remnant Kings=bought for a previous project
  • Emery Dress pattern from The Makehouse, Victoria=$24.64CAD (£12.32)

Grand total of £29.02 for this dress.

Sunday 15 March 2015

The Creative Stitches Show, Victoria, BC

A few months ago I found out that a big crafting show was coming to Victoria, which is not that unusual here. But when I looked closer at the brochure I was very excited to see that there was a great emphasis on garment-making, at least in the workshops being offered over the two-day event. Victoria is Quiltsville, CAN, and although we do have a few apparel fabric shops (Gala Fabrics, Fabricland, and the Cloth Castle in Langford), most events, clubs, and classes focus on quilting - understandable if that's what the customers want I suppose. But not me.
There was a tempting offer to sign up as a volunteer at the show and in return receive free entry over both days and free entry to two workshops. With some great foresight I put my name down for today, Saturday 14th March. If I had opted for the first day the show started (ie yesterday) I'd have had to drop out as I started a brand new job (my first in over 2 years....thanks to my brand spanking new Permanent Residency I'm now officially a Landed Immigrant) on Tuesday of this week.

I've only myself to blame for feeling like I was thrown in at the deep end. I turned up having not heard anything back since I received confirmation of my volunteer shift. I really should have chased up the organisers to ask what was expected of me. But I didn't. So I arrived 15 minutes before my shift, was handed a clipboard and class register and shown where my room venue was. Thankfully it was a small class (only limited by numbers due to the participants using sewing machines in the class) but there was some confusion from some students who hadn't been advised to bring their machines. Understandably they were quite upset about it. Thanks to the wonderful Sawyer Sewing Centre, who had a shitload of machines with them for selling at the show, everyone was soon armed and ready for the star attraction, Mr Ron Collins who was sharing his 'Designer Tips for Couture Results'.

Through the frisson of excitement amongst the students I soon gleaned that Ron was a Big Deal, but certainly not through his demeanour, which was absolutely lovely and unstarry. From what I can gather (and I may be wrong) Ron is the Canadian Patrick Grant, and has appeared in over 180 web videos alongside Sandra Betzina (the fitting expert and Vogue Patterns designer). Just as the class were settling down, Ron asked me if I sew. I replied I'd just started and he took me over to the side where he had a load of his DVDs set out and let me choose one. How generous! I chose one on zips, as you can never know enough of about them, and I still know barely anything. The DVDs usually sell for about $30, so that was no trifle gesture!
Can't wait to watch this. Especially now that the Great British Sewing Bee has finished, and yeah Lorna should have won!
Ron's classes are very hands on, he brings tonnes of samples and encourages you to get up close and personal with them

It soon became apparent that Ron has quite the fan club, and that many of the ladies there (we had one gent amongst the students) had either been to his classes the day before, other classes in Victoria (a few times a year he does some special classes at Sawyer's), and a sewing retreat he mentioned a few times, which one girl I spoke to said was a blast.
Ron with some hair canvas
Ron is a calm and very clear teacher. No umming or ahhing, not rushing through things, and funny and charming. An all round nice guy. He was teaching three classes today (pretty much back to back), and had taught two 3-hour classes yesterday. I mentioned to him at the end of the day that his voice was sounding like it was starting to go, but he said this weekend was nothing: a four-day show or retreat was the real killer!

Sawyer's Sewing Centre is a Victoria staple for machines and notions. I'm definitely going to find out when Ron Collins is next teaching there
Ron recommend quite a few stabilising products from this Canadian shop
Although I was allowed to watch the class, once everyone starting sewing a patch pocket (using Ron and Sandra's couture technique) it wasn't as fun for me to observe, and to be honest I was dying to get round the stalls in the main arena. So I went off for a wander. My wee bubble soon burst as I went round the stalls and to a man (and lady) it was all quilting or embroidery stuff. Sorry, but massive yawn!

I had a wee chat with Barry from the Cloth Castle (who I always talk to when I shop there), and he was telling me about a good fabric store to go to in Portland, when I eventually do get the chance to visit there. Though I can't remember the name of it right now...And an awesome book shop which is seven floors and a block wide. Where do I sign up?

The future's so bright, and so will be my Zumba leggings
Gala Fabrics had bolts going for $6 a metre and a red and white waffle knit caught my eye (I love me some stripes) and also some garish swimsuit fabric (which will do for Zumba leggings), which I made a mental to note to come back for later. I headed back to Ron's class in case I was needed. By the time I had returned he was demonstrating sleeve finishings, so I was able to watch along with everyone else.
A perfectly finished sleeve ready to be set in

I then had to usher in the next class to this room and this is when things went south. The class was called 'Ten Absolutely Fabulous Things to do With Pre-Cuts', a bit of a mouthful, so as people were arriving and asking if this was the right place, I was replying 'yes, are you here for Pre-Cuts?'. I was getting some strange looks and vacant nodding and just plain old befuddledness. I cottoned on that people weren't understanding me (believe me, I see these looks on people's faces on a daily basis) but I was starting to feel like a prize eejit. Well, it turns out they thought I was saying 'peacocks', and so of course they thought they had come to the wrong place. This was a huge class and so after I while I gave up (I promise I was speaking as clear as I possibly could) and just started pointing to the room sign instead.
Captain Pre-Cuts I presume?
This was on the noticeboard outside the Pre-Cuts classroom. Are you trying to tell me something Universe?
Feeling a bit flustered and having finished my volunteer duty, I was swithering whether to just go home and call it a day. I ran into a fellow Weegie gal who lives in Victoria (and also sews! I met her at the Bamboo Leggings workshop at The Makehouse...check out her fab blog about life, love, and everything in between).

Natalie was just about to go into a Learn to Crochet workshop for a few hours. So I went back into the main arena to buy the two fabrics I'd spotted at the Gala stall and then got chatting with the lady helping at their checkout (not actually a Gala employee, but a very frequent and loyal customer). Her mum was from Springburn in Glasgow and was a war bride. She told me that her mum never really settled in Canada, but had gone home to Glasgow soon after moving to Canada and came back again anyway. It was quite depressing to hear that her mum was never truly happy here....But the lady was genuinely lovely and the wee chat buoyed me up a bit (and at least she could understand what I was saying!).
A Gala Fabrics customer recently made this. It's Vogue 8934 and on sale in my Etsy shop, click through to buy

After a magic hot chocolate from Starbucks at the mall across the road (there's nothing a hot choc cannae cure) I headed back to the show for my two free workshops which I'd earned from my volunteering stint. And I am so glad I did!
The unsinkable Kathryn Brown
The first workshop of the afternoon was 'Sewing for a Full Bust' by Nanaimo instructor, Kathryn Brown. Kathryn mostly sews for herself but has fit numerous ladies of all shapes and sizes over the years. She caught my eye as she was looking round the room for a suitable boob model to demonstrate on, measured me up, and said yes I would do. She sweetened the deal by saying I'd get a free pattern, so I was in.
The pattern which Kathryn used to demonstrate the full bust adjustment, and which I got to take home, bonzer!
My big mistake was not taking a pad and pen to the show. Smart phones are great but nothing beats taking actual written notes. Kathryn shared so many great tips as she demonstrated how to do a Full Bust Adjustment on McCall's M5433. My high bust turned out to be 38", which was size 16 on the pattern envelope. And from now on, as Kathryn demands (and correctly so), I should be choosing pattern sizing according to my high bust measurement. This will ensure the best fit for the shoulders, which is crucial. Knowing this starting point means I can actually attempt some of the vintage patterns I have which are 38" bust, which is fecking amazing! I've got quite a growing collection of vintage patterns now (most of which I upload to sell in my Etsy shop) but will be looking at them with fresh eyes, now I know how to choose the correct size for me.
Some of the recommended pattern papers that Kathryn brought
She also hammered it home that tissue-fitting is the cheapest and most time-saving method in making a garment. Kathryn said that she pretty much only muslins for gowns and wedding dresses, and that there is no need to do a muslin for every top, jacket, dress, shirt you make. Fabric will always be more expensive than a pattern, so get it right on your tissue or traced pattern, and don't ruin your fabric with fitting mistakes! She also advised joining Club BMV for discounted patterns, which I am definitely going to do once I get paid.
My first time seeing the slash and spread method in action, very exciting!
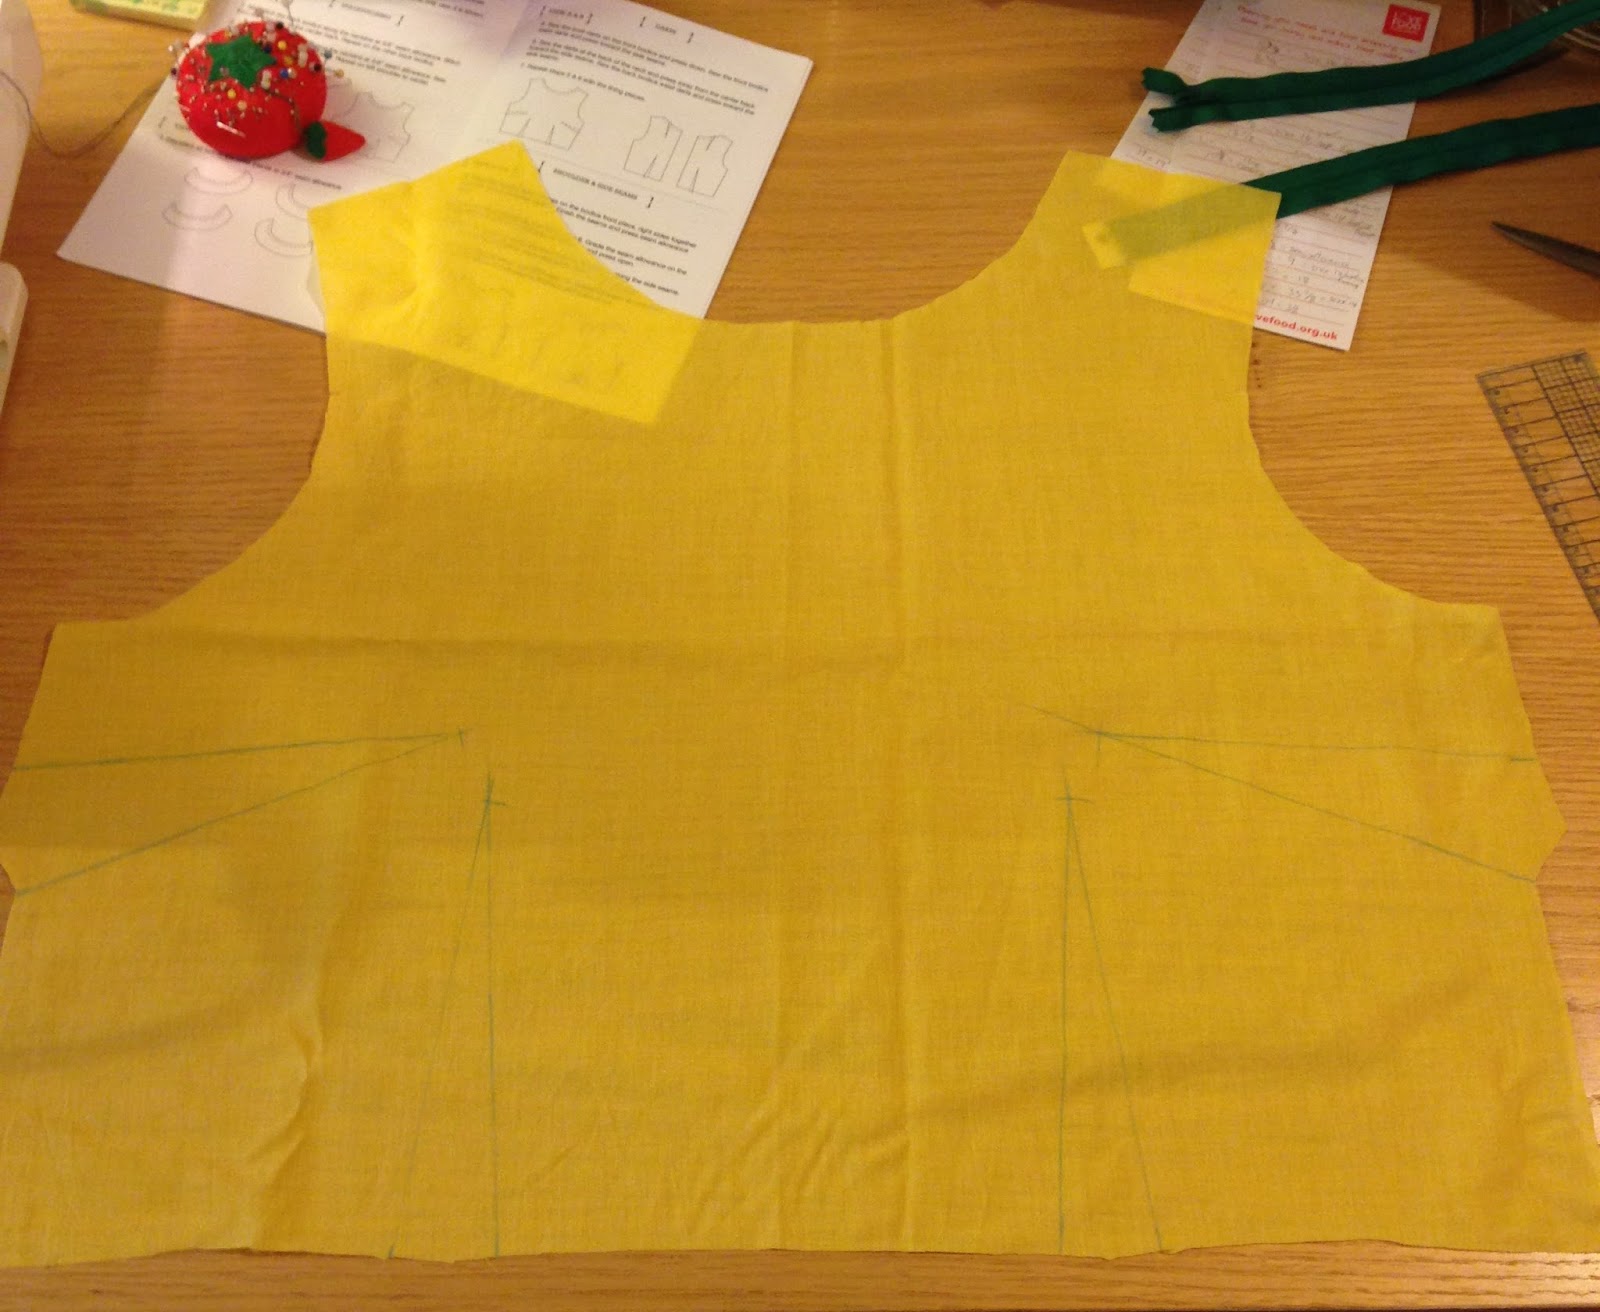
After trying on the pattern tissue which had back and front (and shirt placket) pinned, as well as the original bust dart pinned, Kathryn showed everyone how I needed 3 inches added in order to make the seam edge of the centre front fall down the centre of my body.
Taping on pattern paper in the gaps. Always use Scotch Tape and always only tape on one side (so you can press the pattern from the other side)

The McCall's pattern that Kathryn was fitting on me is a Palmer Pletsch and the method for bust alteration is in the pattern instructions, as well as being covered in the Fit For Real People book, which I have but haven't tackled reading yet! Kathryn was also very excited to tell us that she had just participated in the research (along with 20 other instructors from all over the world) for the new book in the Fit for Real People series, which is Knits for Real People. Having a personal recommendation coming from someone like Kathryn, who was an absolute gem of a lady and a teacher, is all I need to know!
Is it too early to ask for this, Santa?
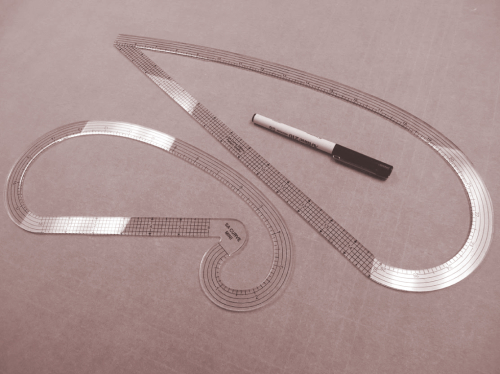
She also told us about a new french curve ruler, fresh on the market, which is cooler than others curved rulers out there because the ruler depth all round is 5/8", therefore allowing you to trace curves on the inside as well as the outside. It's called the SA curved ruler and Kathryn said she got hers on Etsy but I simply can't find it there. I have found it here however. Another tool for the wishlist!
And this? Ta

To backtrack a bit, Kathryn also took us through the history of how sizes and measurements were first established for shop clothing and sewing patterns. The proportions are all thanks to the perky boobed, tiny waisted, perfectly hour-glass wife of one of the men involved with the sewing pattern companies. Thanks to the restrictive undergarments which were prevalent up to mid-20th century, women's bodies were constrained (and imprisoned, if you want to go that far) making consistently proportioned dress sizes possible. The 1960s comes along, and all hell breaks loose, together with girdle elastic and bullet bras. Women are now free to walk around with muffin tops and all sorts of lumps and bumps bustin' forth.
Showing how we can add french darts to t-shirts. Darts should never end in the apex circle
These days, I wouldn't mind being girdled up to my eyeballs, but I'm sure youngsters would recoil in horror at the very suggestion (not that they would even know what a girdle is. I was too young to ever wear one but I do remember them). As Kathryn reminded us, and as I've read in so many dressmaking articles, books, blogs: if a garment properly fits, it's so much more flattering, no matter what size or shape you are. Kathryn also recommended adding bust darts to t-shirts, especially for the full-busted. Something I'll definitely consider. She also told us that we are under no compunction to use vertical darts, such as back or front, if we need the fabric width (instead of narrowed, which is what darts do - they eat the fabric which is not required).
Princess seams are a godsend for adding full bust adjustments
Kathryn also showed us how to move a bust dart and how to treat a princess seam for a full bust adjustment (adjust the pattern piece which has the side seam).

As class ended I left with a perfectly fitted bust for my front pattern piece of M5433. As another student said to me, I was so lucky as I could practically go home and sew it straight up. However, I bumped into Kathryn later on and she said I'll need to do a waist and hip adjustment. I asked what kind of fabric might suit this pattern and she suggested a nice cotton (but not a quilting cotton). I had a wee look in Fabricland just before I went home and they have some lovely voiles, lawns, and I even considered buying a red cotton eyelet. Whoo, check me out! I have plenty of cottons in my stash, no more purchases for me right now! Kathryn told our class to email her with any questions, or even send her pics, so I really want to do her proud and finish the McCall's pattern that she so kindly gave me, and email her my results.

After Kathryn's class it was back downstairs to the lovely Ron Collins again for his 'Taming Knits' workshop. I saw lots of ladies who had been in his 9am class, and as Taming Knits followed on straight from another afternoon class he'd done, they literally never left his side all day. The man's got something!
Not one to do anything by half-measures, Ron brings his own wardrobe to demo on
Ron comes prepared with tonnes of samples: in swatch form; works-in-progress; and his own clothes (not quite off his back, but I did feel a bit guilty copping a feel of his own personal clothes). He took us through the array of knits from jersey (recommending jerseys with cotton or silk, as rayon jerseys pill like crazy) to double knits, lyrca, sweater knits, novely knits, and the holy grail, in Ron's opinion, of knit fabrics: Matte Rayon Jersey.

He also explained various forms of stabilisers and finishings, from Stay Tape to Tricot Interfacing, to Fusible Interfacing, to Foldable Elastic, and self-made knit bindings. To get rid of that pesky curling edge on jersey knits, he recommended using spray starch which is a godsend while you actually construct your knit garment. It was really cool to learn that Ballpoint machine needles should be used for knits with two-way stretch, eg pontes, rib, but for knits with four-way stretch Stretch needles are best.
The knit sewers best friend: clear elastic - which can also be sewn onto bust darts, what a great tip! (no pun intended)
Some useful stabilisers
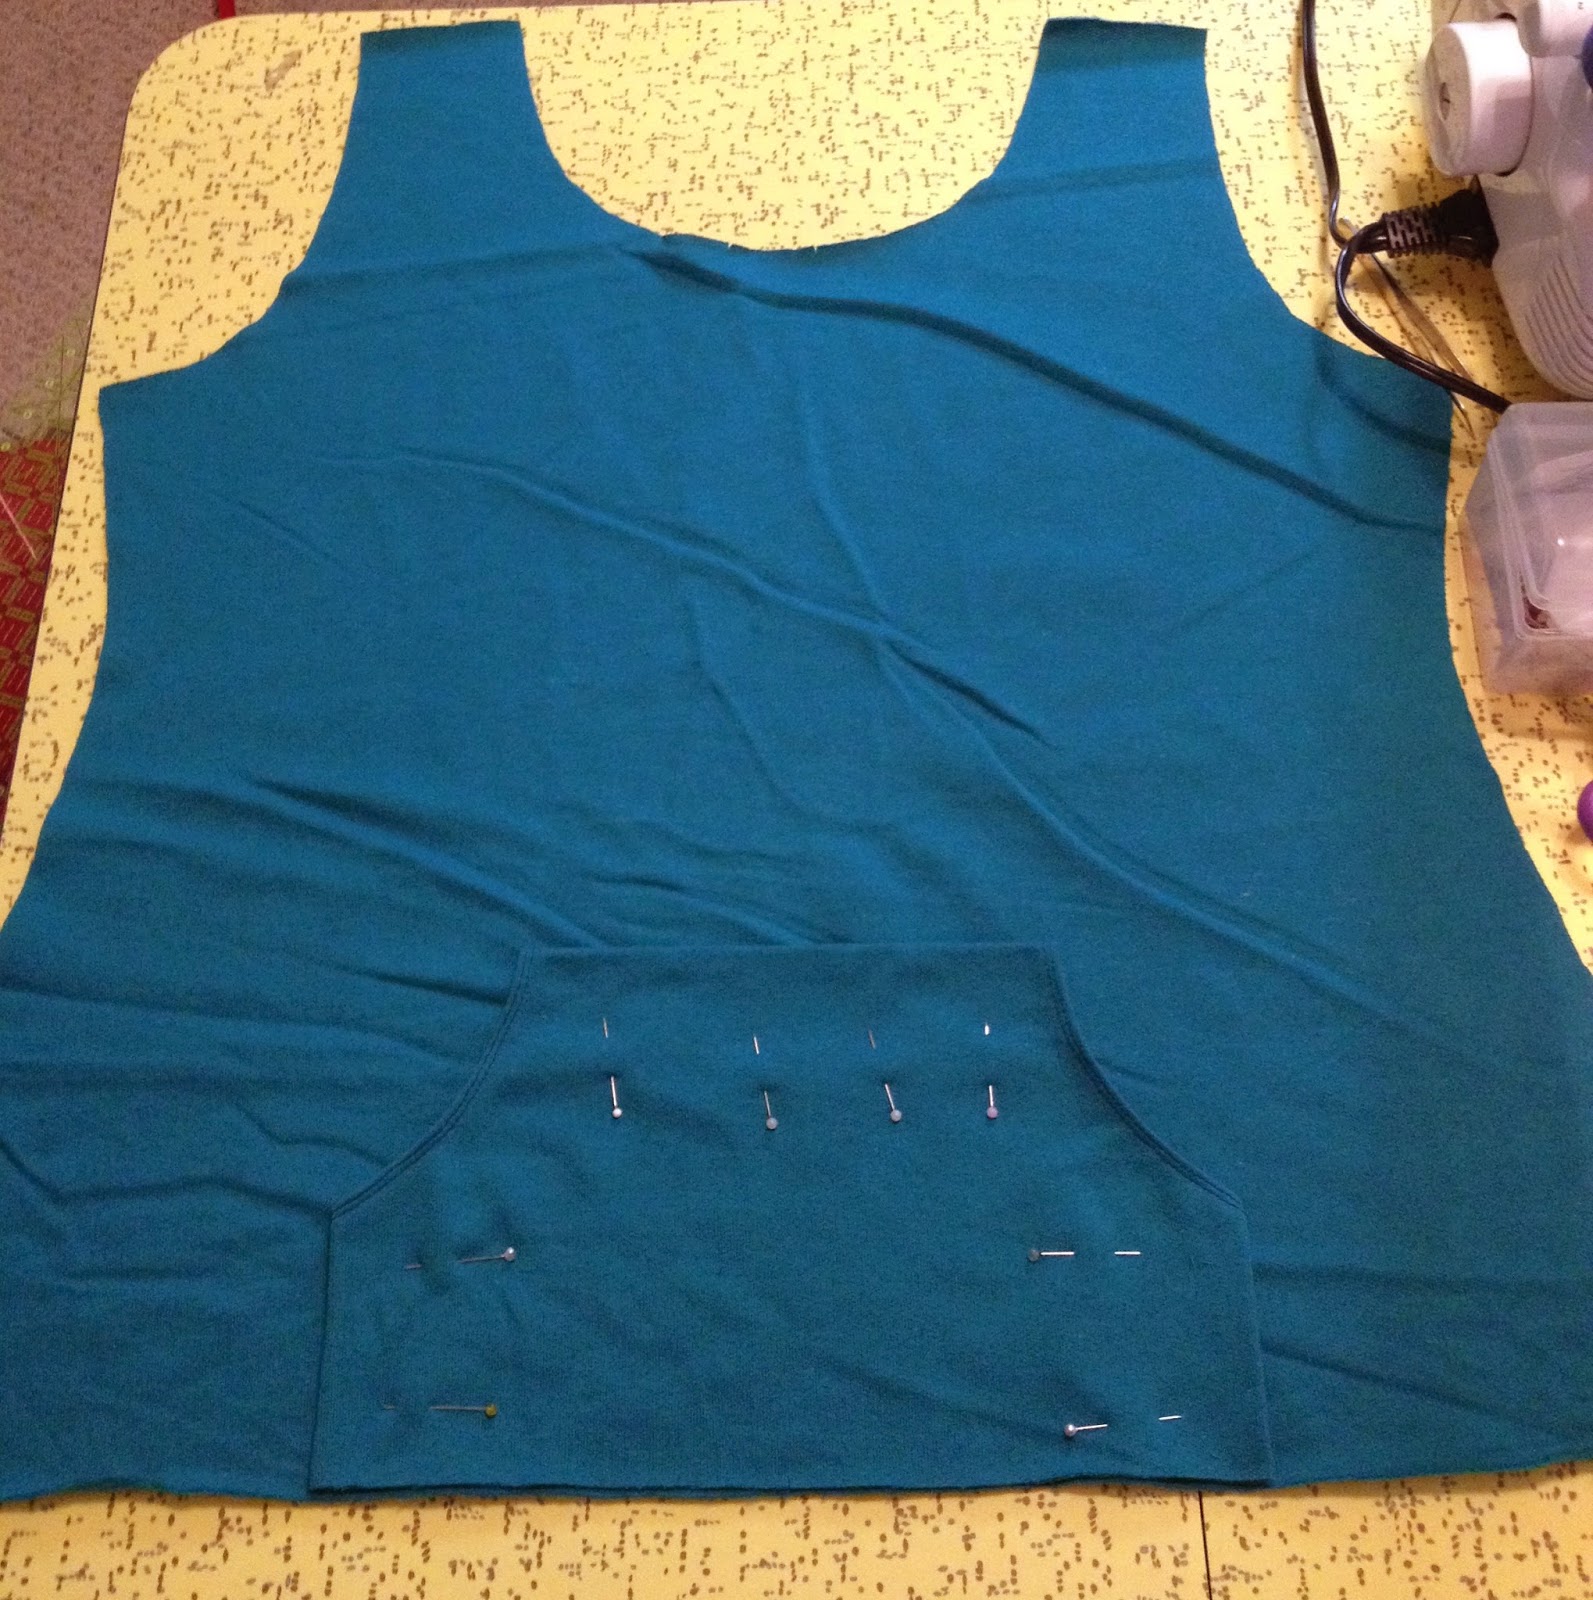
Using mesh knit to line knit shorts. Lining is cut smaller than the leg piece, attached at the bottom hem and then the lining fabric is pulled up so that the waist matches on lining and fashion fabric. This creates an automatic hem at the ends of the leg piece. Nice!
A pattern which Ron has used to make many t-shirts for himself. Jalie is a Canadian company, which I didn't know
By the time the class ended my head was bursting after such a long day of so much information to take in. I knew I had to write this post tonight before I forgot things, which I probably have anyway. It has put me in good stead for any future sewing shows I get the chance to go to, and in the end, being in all the dressmaking classes today really made me realise that there is a healthy non-quilting community in Victoria (and Vancouver Island).

Gala Fabrics is having their monthly sewing meet-up on Easter Sunday, 5th April, and none other than Tasia, the founder and creator of Sewaholic Patterns will be a guest, so I have no excuse to miss such a great get together (I've been too shy to go before). I definitely want to do the corny thing of wearing something made from one of her patterns. I have the Renfrew and the Cambie, and quite fancy her new Davie knit dress (but no.more.purchases!!). I better get my finger out and decide what to make though, because March is flying by already!

Tuesday 17 February 2015

2015: Things are going to start happening to me now!


This is a long overdue catch-up and therefore a long blog post. Feel free to scroll down to the end for the Babs & Donna disco classic, it's what I would do! But I started this blog as a way to record (and remember) the things I make, so I have a few projects to talk about below.

My last blog post was prior to starting Project Mrs Santa and Lady Elf, which is going to have to be blogged separately, cos I can't be arsed writing about it today and I've got loads of pics to go through for that one.

I didn't sew a lot after the costumes were done and dusted because a) I was knackered and b) my t-shirt etsy shop was mental during December and I spent more time at the post office than any human really should in the run up to xmas. Thankfully the staff are mega nice! In fact, I just have to veer off the sewing path here to recall the day that I was making my daily pilgrimage to the post office and I'd just been reading, and watching, about the terrible tragedy which happened in my hometown of Glasgow days before christmas (and which several of my friends narrowly escaped). I'd been crying but had to get to the post office to meet a postal deadline. When the lady behind the counter asked how I was today, well I just blurted out that I had been crying all morning, and why. We chatted a bit about it (aware that there were hunners of people waiting in the queue behind me) and I left. I was crossing the road from the post office when I heard a shout (I had got a fair distance before I heard her)....well had the wee woman from the postie not ran after me out the shop, came up to me and gave me a Starbucks gift card and said 'that's so you can get a hot drink to help you feel better', and ran back as soon as I blurted out a huge heartfelt thank you. It was cold and dark and she was just in her short sleeves. I still can't believe she did that. Tearing up thinking about it now! She was only in to cover the xmas post rush, so I will need to track her down to say thank you properly. The kindness of strangers indeed...

Anyway, back to the sewing update. The big news is that I got a Singer Stylist II Serger (or overlocker, as we Brits say) for chrimble with money my mum and dad sent me (thank you both!). I actually ordered it off Ebay, feeling very guilty at not supporting my local shops here, but I can't argue with getting it half the price than I would pay in town. Sorry, my finances are just too tight not to save hundreds of dollars when I can! The machine arrived on time and is spanking new, so I am pleased with the transaction. Only drawback is that I don't get the benefit of a free learner lesson, which I would do if I had bought local.

During early December the Curvy Sewing Collective had organised a Santa Swap gift-giving thing, where you got partnered up with a fellow sewer (you could choose someone from your own country or not - I did choose from Canada to ensure that I could meet the deadline for posting the gift). I got paired with a cool lady called Sandi, who lives way over on the other side of this gigantic land. She doesn't have a blog (yet, but I think she should start one!) and has been sewing for much longer than I. She gave me a few ideas for things that she has been thinking of buying for herself, and with the set budget of 15 american dollars which we all had to stick to, no matter what country you were in, I was able to get her a kaftan pattern from designer Tina Givens, who is one of her favourite pattern designers.
It was a digital pattern and within 20 minutes of receiving it, she was working on her garment. Pure wee Speedy Gonzalez! In return, she got me possibly the most perfect present....a Craftsy class for Beginner Serging! I had told her that I was getting a serger but wouldn't be getting classes as I'd bought it off Ebay. I am so grateful, and I still don't quite believe she stuck to budget....even though she promises me that she did! Thank you again Sandi, and thanks to Tanya of the Curvy Sewing Collective for organising our bunch of rabble rowsers. I hope they run it again this year! (hint, hint)

Even Miss Havisham got the sewing blues sometimes
Despite having access to the Craftsy class (and another that I bought a few months before, called Sewing With Knits), my overlocker gathered dust till just recently.

I got my sew-jo back in the second week of January thanks to The Makehouse, my wee sewing home from home, and a leggings workshop that I attended. In the space of a few hours (the fabric had been pre-cut in my size, and was ready to sew), I made a pair of leggings which fit pretty much perfectly (I might need to put more of an arse curve in the next time to accommodate my Kardashian) from gorgeously comfy bamboo jersey knit.
Triple zig-zag stitch used to attach elastic directly to leggings (ie not in a casing)
I have worn them a zillion times, and can wear them days in a row without them bagging at the knees. Will definitely have to try to get more of that fabric! Best thing is that the fabric comes free with the workshop. The leggings were made using the overlocker, and so it was a great way to get to try using it with a teacher by my side. 
I love this way of finishing the leggings at the ankles - that's knicker elastic!
A few days later and it was the weekend. At the last minute, my boyfriend managed to score tickets for an Abba/Bee Gees tribute at our local theatre. Probably sound pathetic to you dear reader, but I was ecstatic! I love the Bee Gees and any chance to hear their music played live is going to be a cause for celebration. With nothing to wear, I very cavalierly (is that a word? It is now) grabbed a vintage stretchy knit from my stash, which I bought on Ebay last year) and wondered if I could whip up a dress on my new overlocker in time to wear that night.
Before
By the time I was ready to actually work on making something, it was 1pm. The theatre show started at 7pm, this very same day! I knew I wanted to copy a favourite Primark dress of mine (that is too wee to wear right now! Damn you christmas overindulgence), which is basically a stretchy shift with boob and back darts, boat neck, and three-quarter length sleeves. There are probably 20 patterns out there in the sewing universe that I could have used, or amended, to produce this kind of dress but I had no time to even look. 
After: yeah, I know it looks the same as the before picture!
So I set about tracing round my Primark dress. By the time I had done that, tried to measure and draft the darts, I only had a few hours left to construct it, using an overlocker which for all intents and purposes I really had no idea how to work, not to mention it had come pre-threaded with colours that were no match for my fabric. Cue much terrible stitching and gnashing of teeth.

I'll cut an already over-long blog post short by saying I literally finished it with 7 minutes to slap some semblance of make-up on my face and get out the door. To which I was faced with pouring rain, having not registered it in my total head-down state of the past few hours, and only a denim jacket on. My dress' boob darts are mis-aligned and my hems were held together with Wonder Tape (yes, I didn't even have time to sew them!), but I made it through the theatre show and drinks at a pub afterwards (and no I didn't even get a photo with it on). Talk about fast fashion. And which way to Project Runway, by the way? 
Look at that fabric...weird wild stuff!
(My dress has lain forlorn since that night, with the hems now completely come undone and that wonky boob dart is just staring me out). I'm not sure how I'll fix it but there must be a way. I still have about a metre and a half left of the fabric so can even start afresh if need be. I also want to try adding a peter pan collar and cuffs to make it more 60s. I've been following a fellow blogger, Lazy Seamstress, who is drafting her first pattern and I think it would be a close match for what I wanted to achieve with my Primark copy, so I am looking forward to her announcing the official release of her Weekend Doris.

Wearing my heart on my sleeve, kind of
My next project was back on my sewing machine when I decided to make some wee mindings (scottish word for wee gifts) to take to my friends' who were hosting a Burns Supper. I had some scraps of tartan in a box of fabrics that a lovely Zumba instructor lady gave me last year, and set to making 13 wee tartan heart wristlets for all the women who would be at the Burns night. 
And then there were thirteen
They went down well and the ladies found some creative uses for them (wish I had taken pics) of wearing them as a hair band to make a pony tail and as a tumbler warmer/marker. I'm going to make more to send home. I would have liked to have made brooches but couldn't find any brooch backs in my local shops here. I've also to make a dickie (or it seems it can also be called a 'jabot' but that sounds too much like a posh jobby to me!) for one of my friends who was at the Burns Supper, for her highland dancing outfit. I'm still trying to work out how to make it so it looks something like this:
What a dickie looks like
January is a good time for starting the year off right...just a pity I didn't get that memo! So it wasn't till last week I officially sealed the friendship with my overlocker, at long last! I moved my laptop over to beside my overlocker and settled down to watch the Craftsy class 'Beginner Serging with Amy Alan' which Santa Sandi so kindly bought me. I must confess that I've only made it as far as the end of the 3rd lesson (of 9) so far, because I wanted to get started on a project from my other Craftsy class: Meg McElwee's Sewing With Knits. I know I can, and will, go back to Amy's class though. I love her calm and well-paced teaching style. However, it is a bit confusing to be shown things on an overlocker which is different to your own, particularly when you're a complete novice. But they can't feature every single make of machine, so I totally get it.

So the next day I started watching Sewing With Knits. Meg is bubbly and very sweet but a wee bit long-winded. Doesn't bother me as I can fast forward if I really want to, and find her style to be quite charming and personable which is even more important. Again, I got as far as Lesson 3 (of 10) before I wanted to stop watching and just get on with sewing.

Among the introductory sections, the fabric primer is most useful and I'll be re-watching that. I still struggle with telling the difference between different types of knit fabric and it makes a world of difference as to how your garment turns out: use something with not enough stretch and no 'recovery' and your item will bag out; use something with too much stretch and it may sag and lengthen your garment ('mini to maxi dress in 3 easy steps!').

Different clothing items demand different knits, eg what will work for a stretchy skirt, won't work for a hoodie, etc. Anyway, I'd recently scored 5.5 metres of a gorgeous turqoise sweatshirt fleece for 7 dollars and fleece is a nice stable knit (not too droopy or stretchy) to get started with...and let's face it, I could mess it up and not have wasted too much money! 
My first finished overlocked garment, yay!
The first garment from the 5 free PDF patterns that come with this Craftsy class is a no-zip hoodie. Having looked at the completed projects of other class-takers, I thought the hoodie looked awfy plain and home-made so I thought I would jazz it up a bit by adding ribbed cuffs, a contrast lining for the hood, and a kangaroo pocket. I wanted to add rib hem too and had cut it out, but when I finished sewing I realised that the hoodie is very flared (which I love) and wouldn't suit a ribbed hem after all. The design won out and that's cool with me. 
I left a gap in my serging so I could turn the hood inside out, because I serged the bottom hem of the hood which I didn't need to do, as the hood will be closed up when attached to the bodice. Perils of working the process out myself!
That magic Wonder Tape again! Followed by top-stitching which I realised after is too close to the seam

Had to remember not to sew the curved parts onto the bodice front, or else wee hands won't get in to the pocketses, will it my precious?
Meg's class is all about sewing knits with your sewing machine, rather than an overlocker (which is why I bought the class in the first place, being overlocker-less at the time), so I had to just figure out the stitching myself, as well as how to add the kangaroo pocket, the cuffs, and the lining. All in all, it elongated the project for me but produced a great looking item, which I've worn daily since! I broke a needle and had to re-thread numerous times (my threads kept breaking so I think I had the tension too high?) so all-in-all, my overlocker cherry is well and truly popped! I also used a twin needle on my sewing machine for the first time. My top stitching is not Oscar-worthy for sure, but I can only get better. I also need to buy a wider twin needle as the 2.5/75 gives off two lines of sewing that are just a wee bit too narrow for the look I wanted (especially on the kangaroo pocket).
The topstitching is a bit too narrow for my liking

Can't see it much in this pic but the back is  much longer than the front, maybe I need an FBA?

The hood is a bit Jedi, could do with reducing it next time
I love the navy with the turquoise, it was just navy cotton jersey I had in my stash
Look at those serged seams, bloody love it!
The only seam I didn't serge. Can't remember why, think it was just cos the wrist opening was too small
The most comfy of comfies!
My boyfriend now wants a hoodie, so rather than adapt this lady-bits oriented pattern, I've ordered the McCall's M6614 pattern. I considered purchasing Thread Theory's Finlayson sweatshirt or Newcastle cardigan, but can't afford them right now (I am pretty sure I will purchase them in the near future though). I managed to snag some maroon sweatshirt fleece and black sweatshirt fleece from the thrift shop last weekend for future hoodie makes (as well as for the Jasper hoodie/top/dress from Paprika Patterns which I bought recently).

Completely engrossed in drafting our skirt blocks
Last week I was also back at The Makehouse to do the first night of a two-night introduction to Patternmaking. This class is for creating your own skirt block, or sloper, and is a good basic way in to patternmaking. As basic as it was, it was still waaaaaaay over my head and completely blew my mind. But it was very interesting and a great string to my bow in terms of gathering knowledge. In terms of skills, it will definitely be something that I will either need to re-do or practice a few times because it was a lot of information to take in and I fear it will slip away from my memory like mercury.....

There were two girls in class who had taken the Bodice Patternmaking class previously and they found it all making much more sense, being able to practice drafting again during the Skirt class. So I think it's one of those things that clicks the more you do it. I am definitely interested in the principles and theories behind patternmaking, without feeling any great need to draft anything yet....although it might save me trying in vain to trace round a favourite piece of clothing in future!

The next big project on my list is to make the Jade skirt, also from Paprika Patterns. I bought this PDF pattern last year after seeing it blogged on the Curvy Sewing Collective by Sylvie, but I was right at the edge of the sizing at that time. This week the pattern designer, Lisa, has updated Jade to include plus-sizing going up to 41.5" waist, which reflects the sizing that Jasper already goes up to. I'm not sure the skirt will suit me, but I would like to try the technique involved in creating the folded effect, and can always make it for friends and family if I don't like it on myself.

Okay, enough is enough. Till next time!
Bow before your queens!